Wednesday, January 23, 2013

Sweet Pouch Swap

Hello there !
Hope its not raining where you are !
Hit a crochet slump last night and still haven't finished edging the wavy blanket 
but I was determined to finish SOMETHING this week so today .....

Drum roll please !

I finished THIS little cutie.......

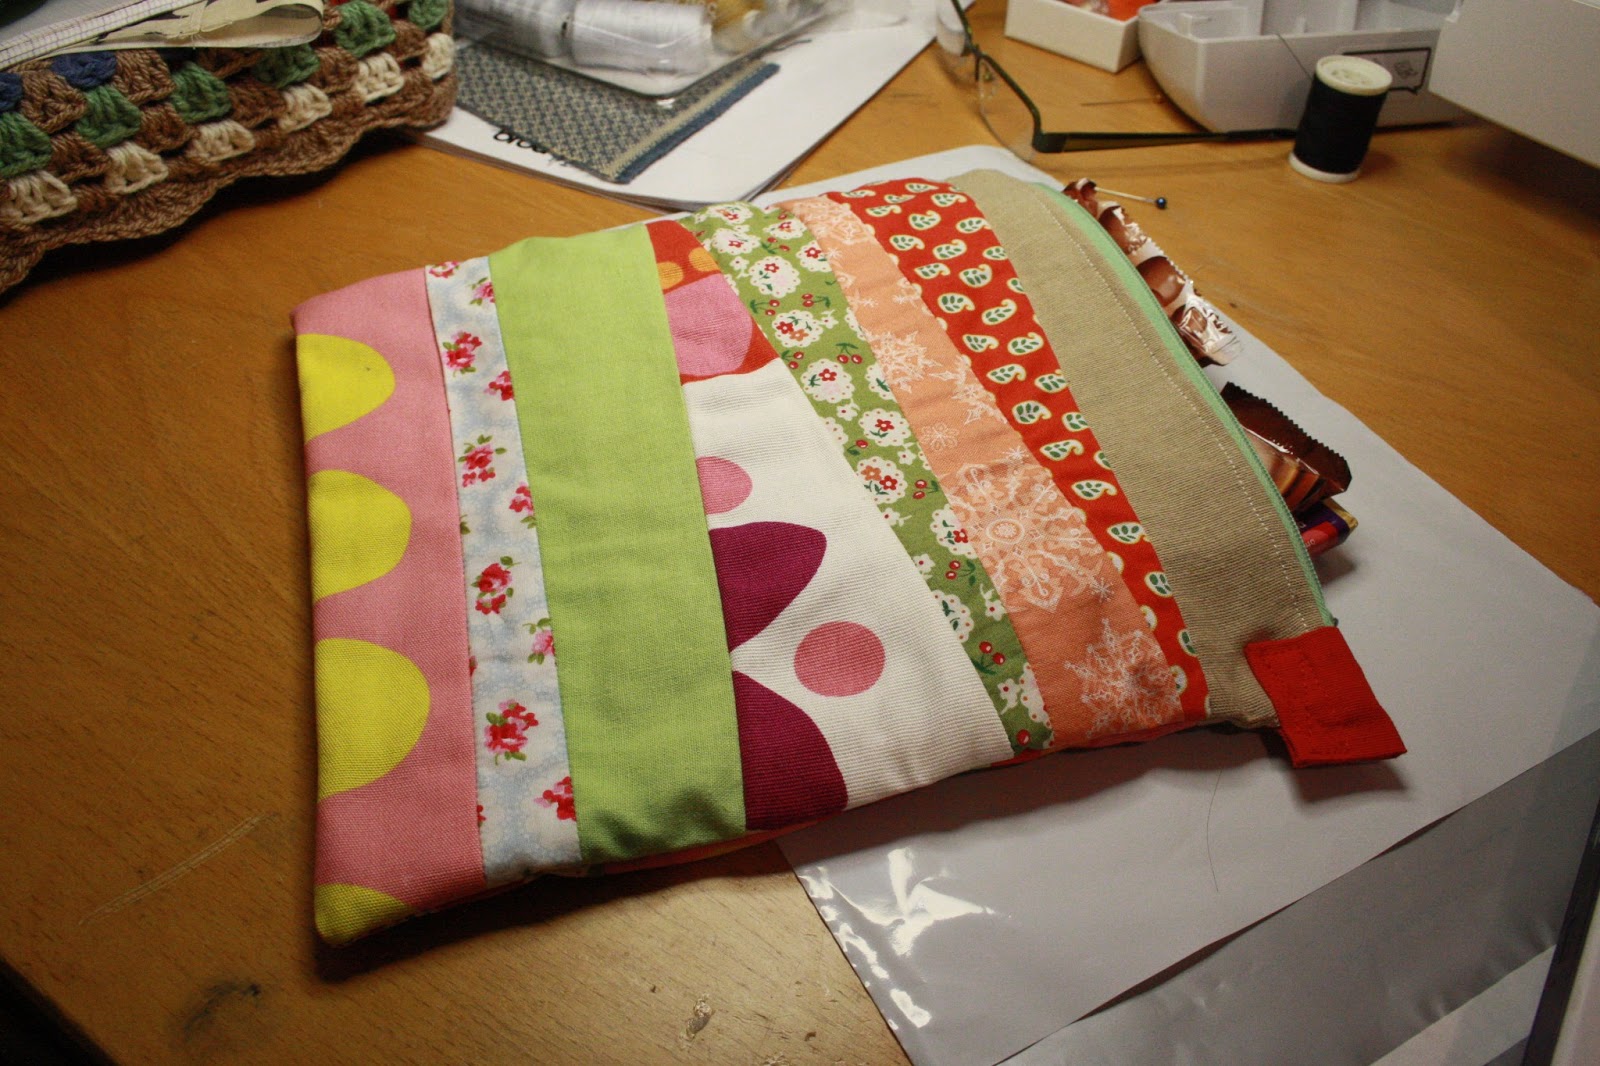
CraftLee - Zippered scrappy pouch

Its a zippered scrappy pouch for the Sweet Pouch Swap organised by the lovely Ros over at Sew Delicious.
Click on the picture below to check out the details of the swap.


My 'Pouch' has somehow taken on the dainty dimensions of a full sized Santa sack 
(yes! That's an super-sized AERO bar inside folks!)
I blame my over enthusiasm to include every scrap of fabric I own in this project !
And since my desk is currently heaving under the weight of all THESE felt flowers 
I decided to slap one on my pouch too!


Stuffed full of chocolate goodies I am just waiting for the rain to stop so I can run out and post this little beauty to my swap partner on the other side of the Atlantic. I hope the recipient likes it !

My kids were so funny when I told them about this swap 
(I knew they'd want to help 'test' the sweets!)

My daughter said 'Oh ! What a cute idea that'll be so much fun...'

My son said 'What if someone sends you poisoned sweets?'

& therein lies the difference between raising boys and girls folks!

I know who I'm sending my pouch to but I don't know who'll be sending a pouch to me!
Sometime over the next few weeks I will hopefully receive a sweet pouch from some other crafty person. In  the interest of gastronomic experimentation I'm hoping that it will be full of sweets I've never tried before !

See! my pouch is so big it even has a pocket in it !

When my pouch has been received and I receive mine I will introduce you to my two fellow swappers.

Thanks for visiting !
& do come back soon !

Love Siubhan x x x


Tuesday, January 22, 2013

Cosy Colourful Crochet

Hello there! 

Brrrr!!! It's soooooo chilly and cold here in Cork this week !!!
It's the perfect weather to snuggle up on the sofa, close to the fire,
hook in hand, adding a few rows to some colourful crochet.

I thought I'd update you on two of my crochet projects; here's a super-quick visual update on my
Wavy Blanket. I just started edging it last night. My dog Cooper has taken a BIG shine to this blanket
and I have to spend a lot of my time shooing her off the end of the work when I'm crocheting!
Here she is 'assisting' me below !!
Wavy Crochet Blanket & Cooper
I know its taken forever but this project was ENORMOUS !!
Ok - maybe not enormous but big enough for snuggling up in
and simply wayyy too big to lug around in your handbag for sneaky crochet sessions outside of the home
(I always find that's the fastest way to finish any crochet project super quick !!)
It's been a great way of getting rid of some of my stash of yarn though.

By the way, if you are looking for some inspirational ideas to use up YOUR yarn stash
then why not follow the clever folks at Stashdown here on Twitter or Pinterest

I'm already planning my next blanket - I'm thinking granny squares & a bit less girlie colours!!
Hopefully it'll be finished before the week is out and I'll take some more pictures then for you !

Wavy Crochet Blanket - Let the edging begin !!!
Next up - you may remember I also treated myself to some Debbie Bliss Cashmerino here
to make a little Christmas present just for myself.
Well, here's a quick look at the results now that I've finished !
A quick stripy hat and cowl made up of double and single rows of trebles. I just made up the pattern as I went along, can't even remember what hook I used !
CraftLee Hat & Cowl in Cashmerino
 A wee bit of soft focus editing does wonders to highlight the crochet flowers & diminish the 'laughter lines' !

I picked the colours to match my most beloved Orla Kiely bag, not an exact match perhaps, but close enough! I wear the cowl a lot more than the hat as its so soft and snuggly I tend to leave it on even when I'm indoors! Lots of people have admired it so I'm pretty happy with it as a project but the yarn was quite costly (about 40 Euros) and I'm not sure that it LOOKS that expensive


Hey!! is that a feather or a leaf on my new hat!!

Thanks for visiting & please do come back soon !

Love Siubhan x x x 


Tuesday, January 15, 2013

Scrappy Scatter Cushion - Free Tutorial

Hello there!

In November of last year I made my first Scrappy Scatter Cushion 
Back then I did promise you a tutorial for this project
and today I made another

I also finally got around to taking some pictures for this fun and easy cushion cover.
Here you go....

Scrappy Scatter Cushion Tutorial


What your going to need -

A cushion pad - (mine was 12" x 12")
Some scraps of fabric for front
Single piece of fabric large enough for back
Some ribbon
Scissors or a cutting mat & rotary cutter
Thread
Sewing machine

Step 1 -

pull out your scrap stash (here's mine!)


& pull out some strips of fabrics that take your fancy and look good together.
Its nice to have a mix of patterned and plain and also think about mixing different textures.


Step 2.

Now iron those scraps, you want them to be a bit longer than your cushion.
Cut the scraps into long triangle shaped pieces and lay them out in a pleasing pattern.


Step 3 

Time to start sewing!
Lay your strips RST (Right Sides Together), pin and sew a single seam.


After you sew a single seam, open it out and iron it flat.


Move along your collection of strips, laying Right Sides Together


& ironing the seams flat as you go.


When you've finished all that sewing & ironing you should have something like this...


Step 4 

Ribbon ! Lay some co-ordinating ribbon on top of your newly sewn scrappy fabric until your happy with the look.


Back to the sewing machine !
Sew the random ribbons in place (you can use one of your fancy stitches if you like)


Now your ready to trim your scrappy fabric to size ....
I trimmed mine to a 13" square (1 inch bigger than my cushion pad )


Step 5.

Now lets tackle the back. Its a simple envelope closure.
I cut two rectangles 13" x 9" one of my rectangles had a selvedge so no need to hem (yayy!)
(but if yours has no selvedge you will need to fold one long edge twice and hem)
For a plain back you can hem both rectangles on the long sides


but in your scrap search you may have found a piece that you can use to trim the cushion closing.
If you choose to trim the back heres the steps
You need a piece of co-ordinating fabric arrrox 1 & 1/2 inch deep.
Fold the fabric in half longways and press


Open out the strip, fold the edges in towards the centre and press again.


Pin the fabric strip along the long side of one of your rectangles, encasing the raw edge.


Finish off with a double row of top stitch.


Step 6 

Nearly there !
Lay your cushion cover down as below , pin and sew around the edges.


Step 7.

Trim the excess and snip the corners. Turn the cover right side out and your done !


Here's a view of the back ...


Now if you like you can embellish the cover a little more, I've added one of last weeks felt flowers


(& if you do make one I would LOVE to see it - why not post a picture on my Facebook Page?!)
Thanks for visiting & do come back soon !


Love Siubhan x x x


Wednesday, January 9, 2013

CraftLee Felt Flower Fun!

Hello there,
I was looking for something to keep my hand busy in front of the TV
so I decided to try and put a dent in my felt stash and make some fab-u-lous felt flowers.
I've blogged about these fun flowers before here.
You can find the tutorial here.

This is what I've made thus far
all displayed on a cute little wire mannequin frame I picked up in the NEXT sale!.


I started with various shades of purple pink and lilac ...


I've got a nice purplish remnant in my stash
and when I make a bag from this I'll have no shortage of flowers to dress it up !


I got the flowery bug and expanded my palette a little ...


I think the green ones will make beautiful accessories for St. Patricks Day !


I've just finished a few small clutches and think these flowers look great on them.


The only problem is its too difficult to choose which colours look nicest!


I love this checked clutch above.
I also bought some black and oatmeal felt yesterday to make some more alternative flowers for it !
Hmmm! Adding to my stash of felt rather than using it up, typical me !

Hope your having a lovely New Year !
Thank you for visiting & come back soon !

Love

Siubhan x x x


Related Posts Plugin for WordPress, Blogger...